01 Jul 2018
Recently I had to build a layout with a horizontal array of NSButtons that are all vertically centered. The tricky part was that one of the buttons needed an indicator view to represent its control state (present for .on, hidden for .off.) Using typical constraints produced a layout like this:
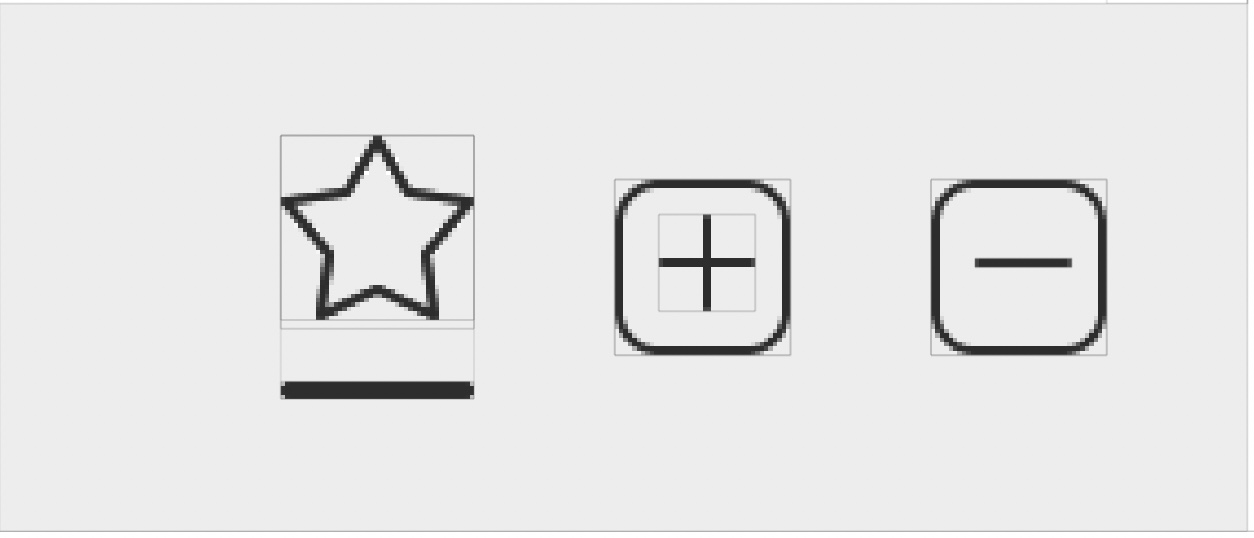
As you can see, the star button’s frame is centered with the frames of the plus and minus buttons, which isn’t what we want. I remembered having seen references to alignment rects in a WWDC session, and after tracking it down on ASCIIwwdc, I learned that you could use your view’s alignment rect to describe the region that contains its content. That region might be different from your view’s frame if you have ornamentation like a drop shadow or, in my case, an indicator view. After double checking the docs I realized that I either needed to:
- override
alignmentRect(forFrame:) and frame(forAlignmentRect:) (which should be inverses of each other) or
- override
alignmentRectInsets
This led to a number of hours frustratedly banging my head against my desk. Here’s what I was doing:
class StarButton: NSControl {
    ...

    enum Metric {
        static let imageHeight: CGFloat = 22
        static let imageWidth = imageHeight
        static let frameHeight: CGFloat = 30
    }

    private func configureViews() {
        for subview in [imageView, indicatorView] {
            subview.translatesAutoresizingMaskIntoConstraints = false
            subview.leftAnchor.constraint(equalTo: leftAnchor).isActive = true
            subview.rightAnchor.constraint(equalTo: rightAnchor).isActive = true
            addSubview(subview)
        }
        imageView.topAnchor.constraint(equalTo: topAnchor).isActive = true
        imageView.heightAnchor.constraint(equalToConstant: Metric.imageHeight).isActive = true
        indicatorView.bottomAnchor.constraint(equalTo: bottomAnchor).isActive = true
    }

    override var intrinsicContentSize: NSSize {
        return NSSize(width: Metric.imageWidth, height: Metric.frameHeight)
    }
}
- The star button has two child views - an image view for the star, and the indicator view below
- Constraints for the image view pinned it to the top, left, and right of its superview, as well as constraining its height.
- Constraints for the indicator view pin it to the bottom, left, and right of the superview
- Override
intrinsicContentSize for the button and return its full size of 22 x 30 points
From here I tried both of the approaches above – first overriding alignmentRectInsets and returning NSEdgeInsets(top: 0, left: 0, bottom: 8, right: 0) (since 8 points is the difference between the view’s frame height – 30 points – and the height of the image view – 22 points.) This didn’t do what I wanted at all. Neither did overriding the alignmentRect(forFrame:) and frame(forAlignmentRect:). I also experimented with getting rid of the intrinsicContentSize override and using explicit width and height constraints (22 x 30) but results were the same.
It wasn’t until I stumbled across an article on objc.io that I spotted the missing piece of the puzzle, namely that the “intrinsic content size of a view refers to its alignment rect, not to its frame.”
In order to get the layout I wanted I needed to:
class StarButton: NSControl {
    ...

    private func configure() {
        for subview in [imageView, indicatorView] {
            subview.translatesAutoresizingMaskIntoConstraints = false
            subview.leftAnchor.constraint(equalTo: leftAnchor).isActive = true
            subview.rightAnchor.constraint(equalTo: rightAnchor).isActive = true
            addSubview(subview)
        }
        imageView.topAnchor.constraint(equalTo: topAnchor).isActive = true
        imageView.bottomAnchor.constraint(equalTo: bottomAnchor).isActive = true    // self.bottomAnchor now describes the bottom of the *alignment rect*
        indicatorView.bottomAnchor.constraint(equalTo: bottomAnchor, constant: -(Metric.frameHeight - Metric.imageHeight) // indicatorView now constrained to be outside the alignment rect
    }

    override var intrinsicContentSize: NSSize {
        return NSSize(width: Metric.imageWidth, height: Metric.imageHeight) // size of the alignment rect, not the view's frame
    }

    override var alignmentRectInsets: NSEdgeInsets {
        var insets = NSEdgeInsetsZero
        insets.bottom = Metric.frameHeight - Metric.imageHeight
        return insets
    }
}
- Constrain the top, left, right, and bottom of the image view to its superview. Since we’re supplying an alignment rect that’s different from the view’s frame, we’re really constraining the bottom of the image view to the bottom of the alignment rect.
- Constrain the bottom of the indicator view to the bottom of the image view, offset by 8 points. Since the image view is constrained to superview’s bottom, this is effectively constraining the indicator view to be “outside of the superview” (i.e., outside its alignment rect.)
- In
intrinsicContentSize return the desired alignment rect size of 22 x 22 points
- Return
bottom: 8 as before in alignmentRectInsets
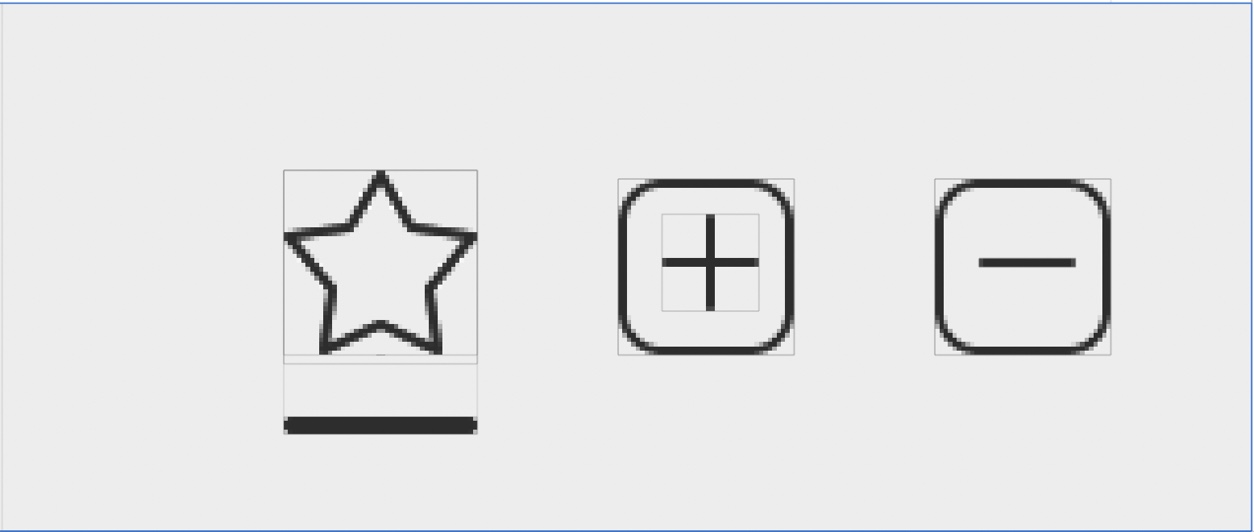
Simple. So here’s what I learned:
- When you’re setting up layout constraints for a view whose alignment rect you want to manipulate, you should think of constraining to your superview’s edges as constraining to the edges of the alignment rect instead
intrinsicContentSize or explicit width and height constraints should describe the width and height of the alignment rect, not the width and height of your view’s frame- Overriding
alignmentRectInsets is easier than messing with alignmentRect(forFrame:) and frame(forAlignmentRect:)
11 Oct 2015
Lately I’ve been working on a Swift framework that I’m integrating into an existing app with CocoaPods. The framework relies on an #if DEBUG macro to run one of two code paths, depending on whether we’re building with the Debug configuration or something else.
public var baseURL: NSURL {
    #if DEBUG
        return NSURL(string:"https://coolapp-staging.herokuapp.com")!
    #else
        return NSURL(string:"https://coolapp.com")!
    #endif
}
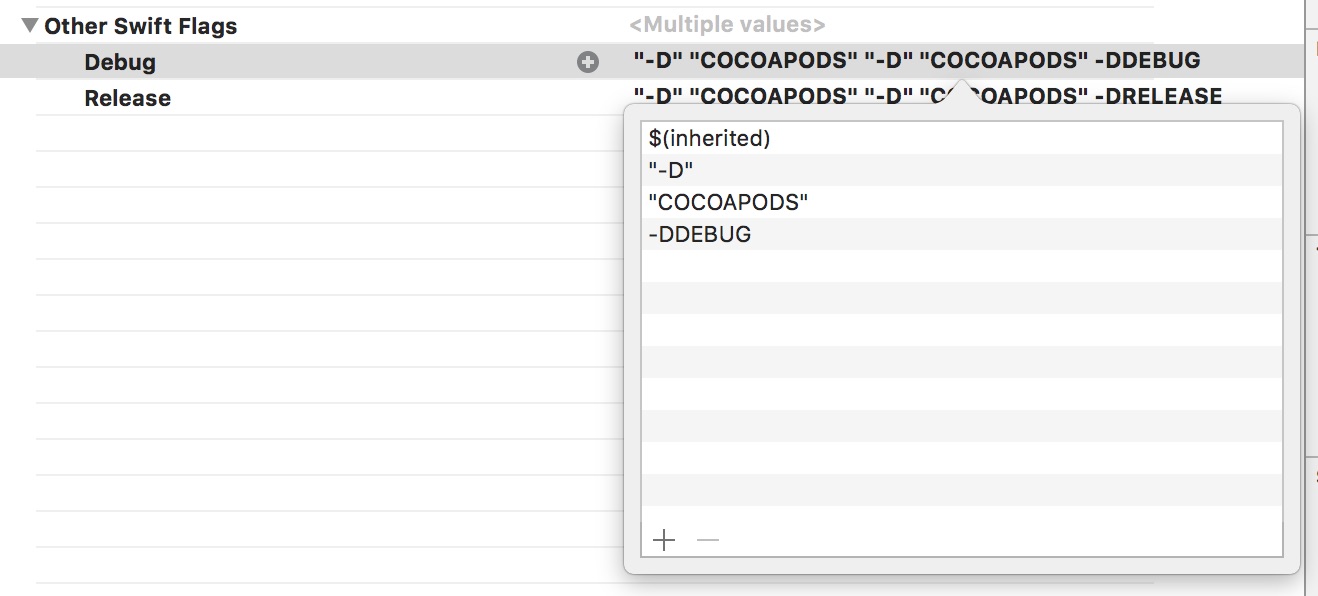
In order for our code to trigger an #if <something> macro, we need to set a -D<something> flag in the other Swift flags section of our target’s build settings. There’s nothing special about “debug” as it’s used here, we’re just creating a global variable and naming it DEBUG.
So far so good – we can see that the #if DEBUG branch runs when we build with our Debug configuration and the #else branch runs otherwise. But this changes when we consume our framework in another project. Firstly, CocoaPods doesn’t look at the build settings in our library’s Xcode project at all. The xcconfig files that CocoaPods generates for our framework are entirely independent of the project file in our framework’s own Xcode project. (Thanks to Caleb Davenport at North for pointing this out.) This means that even if we specify a -DDEBUG flag for the Debug build configuration in our framework’s build settings, they won’t be there when CocoaPods installs the framework into our app’s workspace.
So let’s set the flag higher up, say in our app target’s build settings. Well it turns out that those flags don’t trickle down to our framework targets at compile time. Any flags you set on the app target only apply to the app target.
OK, different idea – why don’t we make the changes in our podspec instead, using pod_target_xcconfig? Unfortunately, it doesn’t seem possible to set flags for only our Debug configuration, which is the whole point. And besides, we don’t want to be beholden to the consumer of our API — what if they’re using a different naming convention for their build configurations?
Fortunately, we can use CocoaPods’s post_install_hooks to get what we want. As you can see in the docs, each framework target holds an array of build_configurations representing the xcconfig files generated for each of our project’s build configurations. Each of these build_configuration objects then holds a hash of build_settings representing the structured data inside the xcconfig file. Using post_install_hooks we can just write out the relevant flags for the configurations we care about.
post_install do |installer|
    installer.pods_project.targets.each do |target|
        if target.name == 'CoolFramework'
            target.build_configurations.each do |config|
                if config.name == 'Debug'
                    config.build_settings['OTHER_SWIFT_FLAGS'] = '-DDEBUG'
                    else
                    config.build_settings['OTHER_SWIFT_FLAGS'] = ''
                end
            end
        end
    end
end
Bong bong.
04 Oct 2015
Moya is functional networking library, built on top of Alamofire, that applies the best of Swift’s language and compiler features to your network requests. Its key insight is tying URL request-building logic to an enumerated type, both guaranteeing that you don’t miss anything (switch statements need to be exhaustive), and allowing you to cleanly factor code out of your main suite of public “call this endpoint” functions. On top of that, there are subspecs supporting both ReactiveCocoa and RxSwift, making it relatively easy to support functional reactive programming in your project.
What’s in the Box?
Target
At its heart, Moya revolves around a single protocol called MoyaTarget. This is the enumerated type alluded to earlier, and encompasses your base URL and paths, supplied parameters, and HTTP methods. Let’s use the Twitter API for this example, and call our implementation TwitterTarget.
public enum Target: MoyaTarget {
    case .HomeTimeline
    case .NewPost(text: String)

    var baseURL: NSURL { return NSURL(string: "https://api.twitter.com/1.1/")! }

    var path: String {
        switch self {
            case .HomeTimeline:
                return "statuses/user_timeline.json"
            case .NewPost:
                return "statuses/update.json"
        }
    }

    var method: Moya.Method {
        switch self {
            case .HomeTimeline:
                return .GET
            case .NewPost:
                return .POST
        }
    }

    var parameters: [String: AnyObject] {
        switch self {
            case .HomeTimeline:
                return [:]
            case .NewPost(let text):
                return ["status": text]
        }
    }

    var sampleData: NSData { return NSData() }  // We just need to return something here to fully implement the protocol
}
So for each of the protocol methods we can switch on self (enums ftw), using let bindings to pull out associated values where we need them. The only non-obvious method is sampleData — it’s related to testing, we’ll come back to it later.
Provider
In order to interact with our TwitterTarget type we’ll need an instance of MoyaProvider; its request method is the gateway between TwitterTarget and Twitter’s servers. While we’re at it, let’s write a public function to wrap all of this stuff up.
    let provider = MoyaProvider<TwitterTarget>()

    public func getTimeline() -> (tweets: [Tweet]?, error: ErrorType?) {
        provider.request(.HomeTimeline) { [unowned self] (data: NSData?, statusCode: Int?, response: NSURLResponse?, error: ErrorType?) in
            guard self.requestSucceeded(statusCode) else {
                let error = // some error
                return (nil, error)
            }

            guard let data = data,
            json = try? NSJSONSerialization(data: data, options: NSJSONReadingOptions(),
            jsonArray = json as? [[String: AnyObject]] else {
                let error = // some error
                return (nil, error)
            }

            let tweets = jsonArray.flatMap { Tweet(json: $0) }
            return (tweets, nil)
        }
    }
Using Moya we’ve factored everything but the bare essentials out of our public getTimeline function. The resulting code is simple, safe, and easy to reason about.
Testing
An awesome feature of Moya is the ability to test our logic with canned API responses with just a couple of small changes to our code. First, let’s implement that sampleData method for real using the sample responses in Twitter’s API docs:
public enum Target: MoyaTarget {

    (...)

    var sampleData: NSData {
        switch self {
            case .HomeTimeline:
                let jsonStr = "[{\"coordinates\": null,\"truncated\": false,\"created_at\": \"Tue Aug 28 21:16:23 +0000 2012\",\"favorited\": false,\"id_str\": \"240558470661799936\",\"in_reply_to_user_id_str\": null,\"entities\": {\"urls\": [],\"hashtags\": [],\"user_mentions\": []},\"text\": ...]"    // truncated because massive
                if let data = jsonStr.dataUsingEncoding(NSUTF8StringEncoding) {
                    return data
                } else {
                    print("Couldn't serialize string")
                    return NSData()
                }

            case .NewPost:
                (...)
        }
    }
}
Now in order to use this in our tests, we’re going to need an instance of MoyaProvider that we’ve configured for testing:
let testProvider = MoyaProvider<TwitterTarget>(endpointClosure: MoyaProvider.DefaultEndpointMapping, endpointResolver: MoyaProvider.DefaultEndpointResolution, stubBehavior: MoyaProvider.ImmediateStubbingBehaviour)
This is almost the default configuration we get with a new MoyaProvider, except for the stubBehavior parameter. We’re using it to tell the provider that we want to use the stubbed responses we specified above, and not actually call out to the network. Now we can write tests like this (using Quick and Nimble, of course):
    describe("Getting the user's home timeline") {
        it("Should have some tweets") {
            getTimeline() { (tweets, error) in
                expect(tweets).toNot(beNil())
            }
        }
    }
Where to go from Here?
In order to add custom headers (say, for authentication), you’re going to need to provide a value for the endpointClosure parameter of MoyaProvider.
let ourEndpointClosure = { (target: TwitterTarget) -> Endpoint in
        let url = target.baseURL.URLByAppendingPathComponent(target.path).absoluteString
        let endpoint = Endpoint(URL: url, sampleResponse: .Success(200, {target.sampleData}), method: target.method, parameters: target.parameters)
        let headers = headersForTarget(target)
        return endpoint.endpointByAddingHTTPHeaderFields(headers)
}

let provider = MoyaProvider<TwitterTarget>(endpointClosure: ourEndpointClosure)
Functional Reactive Programming
If you’d rather use signals than completion closures you can still use everything we’ve done so far, only swapping the base MoyaProvider out with RxMoyaProvider (for RxSwift) or ReactiveCocoaMoyaProvider (for Reactive Cocoa). Now the provider’s request method returns an Observable (or Signal) that you can map, filter, and bind to stuff.
Happy coding!
03 Oct 2015
What is Marginal Futility?
In the world of economics, marginal utility is the amount of benefit provided by some small change — another slice of pizza, an extra minute of leisure time, or that one last beer. With Marginal Futility, my goal is to log the little things I figure out as I try to get better at programming, hopefully giving others a leg up along the way.
The blog is inspired by awesome people like Julia Evans, Natasha the Robot, and Ash Furrow, who advocate writing at all costs. Also, a massive thank you to the Recurse Center, the greatest place on earth.